Protecting Exchange Online email with mail flow rules (Office 365 Message Encryption).
You may not have setup AIP, but still want to protect some of your emails automatically. If you have an Office 365 E3 (or higher) license you can use Encrypt and Do Not Forward rules to protect your emails.
Note that you will have to have a license that allows you to use the (Rights Management Service) to set up Message Encryption. Examples of this is Office 365 E3/E5, EMS E3/E5.
Encrypt
This does exactly what it says. It encrypts data, the email is encrypted and recipients must be authenticated, but then they have all usage rights except Save As, Export and Full Control (Basically means no restriction except that they cannot remove the protection).
Do Not Forward
When the Do Not Forward option is applied to an email, the email is encrypted and recipients must be authenticated. Then, the recipients cannot forward it, print it, or copy from it. For example, in the Outlook client, the Forward button is not available, the Save As and Print menu options are not available, and you cannot add or change recipients in the To, Cc, or Bcc boxes.
Your users can choose to apply these manually, but maybe you want it to be more like automatic behavior? We can do this by creating a mail flow rule. This means that every mail we send where the predefined requirements are triggered will be protected with the settings we want. We can do this by going to our Exchange admin center in the Office 365 portal, and choose mail flow. Under rules, we have the plus sign that opens the following menu:
We can choose to Apply Office 365 Message Encryption and rights protection to messages.
The new rule box opens:
Notice that the Apply Office 365 Message Encryption .. is preselected under Do the following, but no action has been defined.
We have a lot of different options under Apply this rule if:
Note that you will have to have a license that allows you to use the (Rights Management Service) to set up Message Encryption. Examples of this is Office 365 E3/E5, EMS E3/E5.
First a short explanation of the two:
Encrypt
This does exactly what it says. It encrypts data, the email is encrypted and recipients must be authenticated, but then they have all usage rights except Save As, Export and Full Control (Basically means no restriction except that they cannot remove the protection).
Do Not Forward
When the Do Not Forward option is applied to an email, the email is encrypted and recipients must be authenticated. Then, the recipients cannot forward it, print it, or copy from it. For example, in the Outlook client, the Forward button is not available, the Save As and Print menu options are not available, and you cannot add or change recipients in the To, Cc, or Bcc boxes.
So how can we do this automatically?
Your users can choose to apply these manually, but maybe you want it to be more like automatic behavior? We can do this by creating a mail flow rule. This means that every mail we send where the predefined requirements are triggered will be protected with the settings we want. We can do this by going to our Exchange admin center in the Office 365 portal, and choose mail flow. Under rules, we have the plus sign that opens the following menu:
 |
| The Exchange admin center |
We can choose to Apply Office 365 Message Encryption and rights protection to messages.
The new rule box opens:
 |
| The mail flow rule |
We have a lot of different options under Apply this rule if:
 |
| A lot of options |
But for this post we will say that our requirement for the rule is that the message subject or body includes the word Secret.
 |
| We need to define what should trigger the rule |
We need to select a “template”
 |
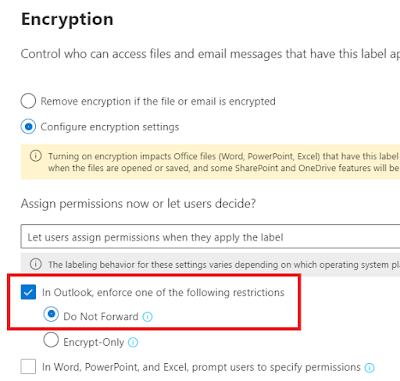
| Template - Do Not Forward |
We choose Do Not Forward as shown.
 |
| Do Not Forward is selected, but we can choose other stuff as well. |
This is all we need to apply the protection.
Let’s test our new policy. I create a new email and type secret into the Subject field (and body, just to be sure).
The email arrives like this:
 |
| Ohh.. A padlock! |
Notice the padlock.
I can not preview the email, and opening it, I see that it has been applied Do Not Forward – Recipients can’t forward, print, or copy content.
Permission granted by MeganB etc.
So, the email has been automatically protected by our mailflow rule and as a result I cannot take a screenshot of the email. You’ll just have to take my word for it.


Comments
Post a Comment