Azure Information Protection: Initial setup in a few easy steps
Last time we looked at what AIP is, and why you should consider implementing it. In this post, I will try to show you how to get started with some of the basic functionality included in AIP.
Oh, just in the case you missed my first introduction to AIP, you may catch up by reading here
Now onto this blog: You will need a subscription that includes AIP, and there are a few different paths:
You can choose to buy the license for AIP directly with one of these:
There are many questions around this, and people often ask me if it is enough to have a couple of P2 licenses to leverage the advantages there. Well, Microsoft has been clear on this. When you have a mix of P1 and P2 licenses, make sure you create a scoped policy for the P2 users, and do NOT configure any options that require a P2 license in the global policy. Also, I am asked what if not everyone in the organization has a AIP license? Let’s say some users only have a license for Office 365 that includes the Azure RMS service? Well, then you will have to make sure those users do not download the AIP policy. This can be done by editing the registry on the client computers.
When you have a valid subscription, you will have to enable AIP in the Azure Portal. To do this, go to “More Services” in the portal, and start typing. You should “star” this since you will be using it a few times. Selecting the star means it will be added to your list of services for the future.
You will see the option: Protection Activation on the bottom of the list:
When you have selected Activate, you will have to wait a few moments for the status to change:
Now, you have the option to start using AIP. You will automatically receive a default policy called Global. This is the default policy for all users in the tenant.
This policy will include some default labels with some predefined settings. Selecting any of these will take you to the settings for that label only, but first we will look at some settings that are “global”.
Do you want users to receive a default label when they save a new document or email someone? This allows users to think of what they are doing and requires them to “de-label” or change label if they think that the automatic label does not apply.
All documents and emails must have a label
Any document that is saved or email sent must have a label. This might be manually assigned by a user, automatically as a result of a condition, or be assigned by default by the Select the default label option (described above).
If a label is not assigned when users save a document or sends an email, they are prompted to select a label. This can be useful, but it can also be an annoyance.
Justification
Do you want users to provide justification if they set a lower classification label, remove it completely or remove protection? Also, a good way to get users to think of what they are doing. The action and their justification reason are logged in their local Windows event log: Applications and Services Logs > Azure Information Protection.
Display the Information Protection bar in Office apps
This allows users to select labels from a bar in Word, Excel, PowerPoint, and Outlook. If it is turned off, users must select labels from the Protect button on the ribbon. When this setting is on, users can select labels from either the bar or the button.
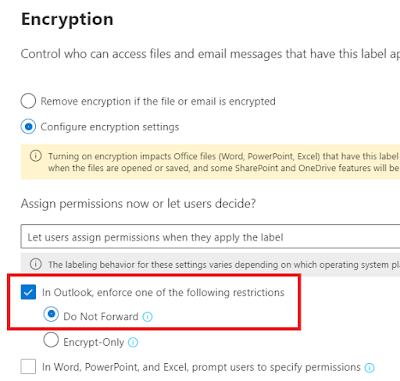
Add the Do Not Forward button to the Outlook ribbon
This one is interesting. The “Do Not Forward” button makes it easy to send protected email to anyone outside of the organization. The email will be protected from forwarding (as the name indicates), from printing and from copying.
Make the custom permissions option available for users
When this setting is on applied, users can set their own protection settings and override any protection settings that you might have included with a label configuration. When this setting is off disabled, the custom permissions options are not available for users to select.
When we have activated AIP, it is highly recommended to install the AIP client for yourself, and/or your pilot users. This will give you a couple of advantages when it comes to trying out/using AIP. First, you will see the “sensitivity bar” in your office apps. This tells you which sensitivity the document has, and the labels that are defined in the Azure portal will be displayed as easy to use buttons inn all full Office apps.
Editing a label and applying protection
When you start AIP, you will have a few default labels. These are not linked to any form of protection, so if we want to be able to encrypt and track information, we will need to start with that. I am using the Confidential label as an example here:
Selecting Protect brings up a new option called Protection. If we select this, we can choose how we want to protect content labeled with Confidential. We can choose to set permissions or use a predefined template. We also have a new option called set user defined permissions where we can choose to apply Do Not Forward in Outlook (Works externally), and/or prompt for custom permissions in Office and file Explorer. We can select one of the two predefined templates. Microsoft can change the names/content in these, but as an example I will use the ones that were created automatically in my tenant. It may look differently in yours depending on when you activated AIP.
When I have chosen to protect documents and emails containing a label, I might want to add a few other neat features to the label. Like set visual markings on documents (headers, footers and/or watermarks), and if we want to use any of the automatic features (remember this requires E5 or P2 license) we also configure this here. In the next post we will look more at Protection templates, and specifically how we can scope templates to certain groups in our company, like HR and Legal.
Oh, just in the case you missed my first introduction to AIP, you may catch up by reading here
Now onto this blog: You will need a subscription that includes AIP, and there are a few different paths:
You can choose to buy the license for AIP directly with one of these:
- Azure Information Protection P1
- Azure Information Protection P2
- Enterprise Mobility + Security E3
- Enterprise Mobility + Security E5
There are many questions around this, and people often ask me if it is enough to have a couple of P2 licenses to leverage the advantages there. Well, Microsoft has been clear on this. When you have a mix of P1 and P2 licenses, make sure you create a scoped policy for the P2 users, and do NOT configure any options that require a P2 license in the global policy. Also, I am asked what if not everyone in the organization has a AIP license? Let’s say some users only have a license for Office 365 that includes the Azure RMS service? Well, then you will have to make sure those users do not download the AIP policy. This can be done by editing the registry on the client computers.
When you have a valid subscription, you will have to enable AIP in the Azure Portal. To do this, go to “More Services” in the portal, and start typing. You should “star” this since you will be using it a few times. Selecting the star means it will be added to your list of services for the future.
 |
| AIP in the Azure Portal |
 | |
| Activation button in AIP |
 |
| Activation status |
 | ||||
| The default policy |
 |
| Global settings |
Things to note here:
Select the default labelDo you want users to receive a default label when they save a new document or email someone? This allows users to think of what they are doing and requires them to “de-label” or change label if they think that the automatic label does not apply.
All documents and emails must have a label
Any document that is saved or email sent must have a label. This might be manually assigned by a user, automatically as a result of a condition, or be assigned by default by the Select the default label option (described above).
If a label is not assigned when users save a document or sends an email, they are prompted to select a label. This can be useful, but it can also be an annoyance.
Justification
Do you want users to provide justification if they set a lower classification label, remove it completely or remove protection? Also, a good way to get users to think of what they are doing. The action and their justification reason are logged in their local Windows event log: Applications and Services Logs > Azure Information Protection.
Display the Information Protection bar in Office apps
This allows users to select labels from a bar in Word, Excel, PowerPoint, and Outlook. If it is turned off, users must select labels from the Protect button on the ribbon. When this setting is on, users can select labels from either the bar or the button.
Add the Do Not Forward button to the Outlook ribbon
This one is interesting. The “Do Not Forward” button makes it easy to send protected email to anyone outside of the organization. The email will be protected from forwarding (as the name indicates), from printing and from copying.
Make the custom permissions option available for users
When this setting is on applied, users can set their own protection settings and override any protection settings that you might have included with a label configuration. When this setting is off disabled, the custom permissions options are not available for users to select.
When we have activated AIP, it is highly recommended to install the AIP client for yourself, and/or your pilot users. This will give you a couple of advantages when it comes to trying out/using AIP. First, you will see the “sensitivity bar” in your office apps. This tells you which sensitivity the document has, and the labels that are defined in the Azure portal will be displayed as easy to use buttons inn all full Office apps.
| The AIP bar - example |
When you start AIP, you will have a few default labels. These are not linked to any form of protection, so if we want to be able to encrypt and track information, we will need to start with that. I am using the Confidential label as an example here:
 |
| Add protection to label |
- Companyname – Confidential
- Companyname – Confidential View Only
When I have chosen to protect documents and emails containing a label, I might want to add a few other neat features to the label. Like set visual markings on documents (headers, footers and/or watermarks), and if we want to use any of the automatic features (remember this requires E5 or P2 license) we also configure this here. In the next post we will look more at Protection templates, and specifically how we can scope templates to certain groups in our company, like HR and Legal.


Comments
Post a Comment