AIP – Policies, Labels, templates and protection explained
As simple as AIP can be, it can also become really confusing. All this talk about labels, policies, scoped policies, templates and protection can seem a bit hard to grasp at first, but I will try to simplify it here.
This is a part of a series of blog posts about AIP.
Edit: Some Updates to this blogpost.
AIP is changing fast, so some of the content in this, and the two other blog posts linked under, may be outdated. For a more updated view on things read AIP in the Azure Portal (although the old ones can probably be useful as well).
The policies in AIP includes labels, labels can be linked to protection, and we can define protection in templates. Well, that was how it used to be at least. Microsoft seems to be moving away from the old-style RMS protection templates, and if you select a “protection template” now and choose to edit the template, you will see the following message:

As you can see, it seems like the focus moves away from protection templates as a stand-alone entity, to labels with protection. The default ones are still there, and you can use them, convert them to labels etc. But you cannot create any more like them in the Azure portal. For this you would have to use PowerShell (Add-AadrmTemplate).This is a part of a series of blog posts about AIP.
Edit: Some Updates to this blogpost.
AIP is changing fast, so some of the content in this, and the two other blog posts linked under, may be outdated. For a more updated view on things read AIP in the Azure Portal (although the old ones can probably be useful as well).

Not helpful you say? I will try to elaborate:
Policies: The entire rule-set that includes everything else. Labels, settings for users, protection etc. There is always a global policy, and you can chose to created scoped policies for groups of users.
Labels: This is not just a way to mark information according to sensitivity. It is a way to give a file a set of properties like visual markings, watermark, permissions etc. It is also where we setup automatic behavior for those who have the necessary license for this (P2/EMS E5)
Protection: This is now linked to a label. We no longer create RMS templates like we used to, but as we set permissions for the labels, we apply the wanted protection. We can choose from the following three:
- Set permissions: We manually specify the permissions, content expiration and more. We assign permissions to Azure AD objects. There are no possibilities to assign anything to a local AD user for instance.
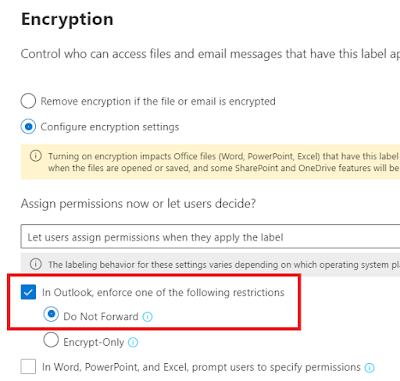
- Set user defined permissions: Here we can choose from either using the “Do Not Forward” policy we have covered earlier, or we can prompt users to manually specify custom permissions in Office files and file explorer.
- Select a predefined template: We can choose from the predefined templates and customize the settings there.
Templates: A set of protection rules that specifies what restrictions should be used (which users, which permissions, how long do they have access etc.)
I have been asked sometimes why the templates suddenly are missing from the portal after playing around with them. If you don't see your default templates in the Azure Information Protection - Global policy blade, they are converted to labels, or linked to a label. They still exist as templates, but in the Azure portal, you see them as part of a label configuration that includes Azure RMS protection. You have not deleted the templates (which actually is impossible in the portal), unless you have done it properly with PowerShell (To delete it, make sure the template is not in use and run Remove-AAdrmTemplate).
It is important to know that when you convert or link a template to a label, it can no longer be used by other labels. In addition, this template no longer displays in the Protection templates section.
So, how do I create new templates, you ask? Well, a new template will be created when you create a new label with the protect setting: Azure (cloud key). This will not be visible under Protection templates, like the ones you get as default, and it is not possible to use on other labels. When you remove the protection from the label, it is gone. For more examples, see Microsoft Docs.
I hope this made it a little more understandable. Well, let’s continue talking about policies, and the Global policy first. When we have activated AIP, the Global policy will be applied for all users. This contains the Information Protection bar, global settings and global labels, but not many settings have been configured initially. For some of us, this can be enough, and we can be happy with just tweaking the settings there, and start using AIP as is, but many wants different settings and labels for specific users/groups. To do this, we need what is called a scoped policy. This does not mean that the users won’t receive the default policy, they just get the scoped ones too. When a user is configured for more than one policy the last policy setting is applied.
So, in which scenarios would we need this? For instance, it could be for specific departments that work with sensitive information. Let’s use HR as an example. We may want them to have a default label/protection for all the documents they create and emails they send. They may work with information that the rest of the users in the organization shouldn’t be able to see. Like personnel info and more.
To create this policy, we go to scoped policies in the left column.


Select which users or groups get this policy
This needs to be users/groups in Azure AD

We will see the same labels in this scoped policy as we did in the global one, but here we cannot edit them, we can only add sublabels to them.
 |
| Notice that other options are greyed out here. |

I have now created a scoped policy that only applies to my defined groups/users. Here I can choose to configure settings that are specific for these users, for instance a default label for all the documents they save, emails they send or any of these settings.

Edit: This blog post may be outdated, but it still decribes some of the features that is being used in AIP/MIP today. Labeling is being moved from the Azure portal to Sensitivity labels in Office 365 portal, and there is a lot of focus on making information protection easier to configure and use. To see more about how information protection has evolved I suggest reading some of my newer posts.


Comments
Post a Comment